
Hello Lovelies~
HAPPY EASTER!
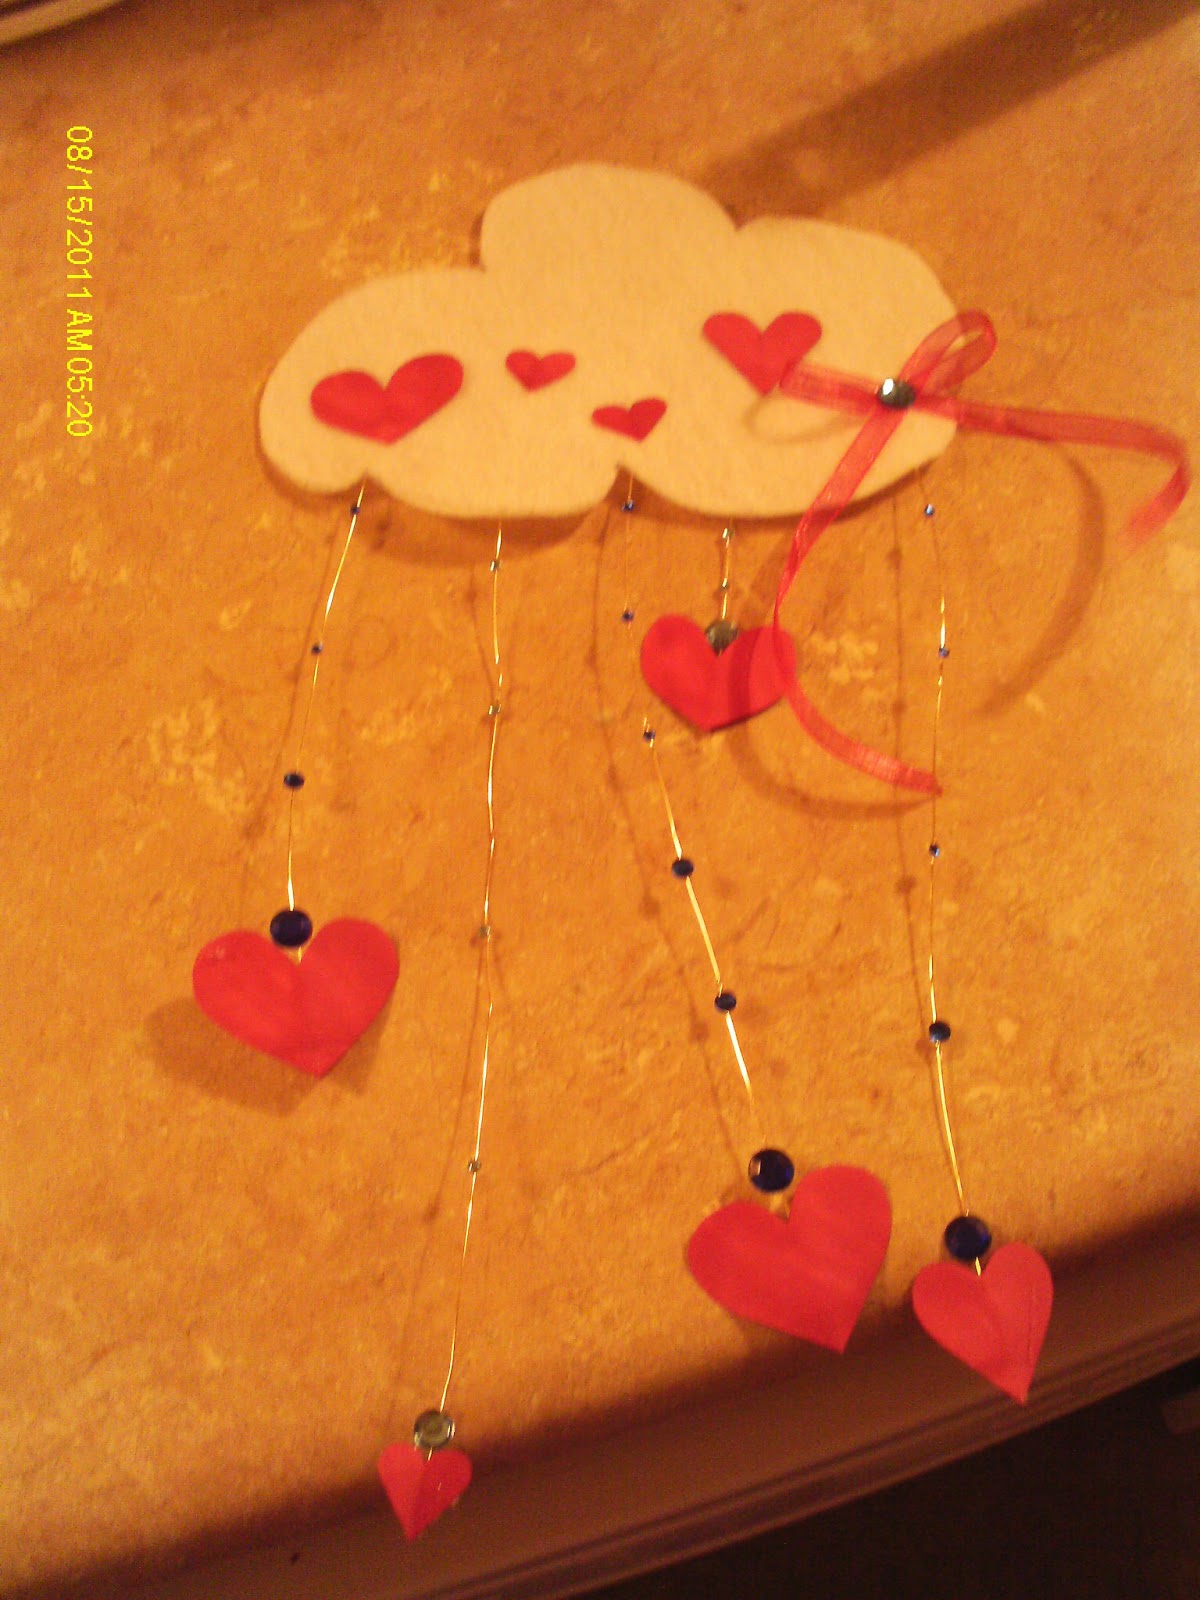
This month is all about April Showers and more importantly, Rain. I got this cute idea for a rain cloud wall decoration and it won't cost more than $5-ish. $10 if you follow the steps needing rhinestones.
This project was supposed to be simple with 7 easy to follow steps, but I swear by the time it was all finished it turned out tons cuter than I had originally planed and a whole lot more complicated. By the end it took four hands and quick timing.
But two hands will work just fine with no issues ^_^
Here we go.
What you'll Need :
* White Felt
* Red Felt
OR
* Red Colored Paper
* Ribbon/Gold Wire
* Glue (Use whatever glue will work with Felt. I am going to use Hot glue. But if you got with hot glue, use a low heat or it will melt acrylic felt.)
*Flatback Rhinestones in multiple sizes
*Ribbon
Step One~
One the white felt, draw a cloud shape. You can free hand this or use a template. Google has some really cute templates for rain clouds if you'd feel more confident doing it that way. I did mine free hand.

Step Two~
Cut out the cloud and marvel at the fact that yes, it's a cloud. This is a very important step, so don't skip it ^_~
As long as it's puffy, it doesn't have to be perfect. Clouds aren't perfect either. Have fun with it.

Step Three~
Cut hearts out of the Red Felt/Red Colored Paper. You can either make them all the same size, or different sizes. I went with multi sizes for a bit of fun.
This is how I did mine as I had no red colored paper. But I had a Copic Marker and that solved the issue nicely. ^_^


Step Four~
Cut your string/ribbon/wire you're using into different lengths, then glue them to the back of the cloud.

I used a small square of felt on the back of the cloud to secure the wires down. I was told this was a good was to keep everything together forever!

If you'll notice I used Hot Glue to make sure everything stayed and when I flipped the cloud over I found out that the felt squares holding the wires down could be seen through the white felt and looked like brown spots!

But I was able to fix that easily!
Here's my tip when crafting, and it's something I tell everyone and honestly believe. ALWAYS, always always always, expect the unexpected and make more of things than you need.
I made more hearts than I needed thank goodness, so I was able to cover up those brown spots, but I was short one, so a bit of ribbon and a 8MM/10MM flat back stone fixed that problem nicely and it added a little something extra.

Step Five~
Glue the hearts to the end of the string/yarn and wait for them to dry. At this point, I would apply a hard backed book or something else just as flat and heavy to keep everything connected till it dries unless you are using Hot Glue, which dries very very fast, so set your hearts just right, you won't get a lot of time to realign them.
Again, I sealed the wires with a small square of felt, but that step is optional.

Step Six~
This is wear is was going to end, but with a little encouragement and a great idea from my friend Jenee from JunkyAlchemy, I went a bit further but this step and everything after doesn't need to be done to enjoy your new wall decoration.
This is where I needed an extra set of hands, and things got a bit crazy. If ya'll didn't know this, Hot Glue dries the moment you look away from it. So if you don't have to use hot glue for this step don't. Instead use something equally strong like E-6000, but you might need to take it slower with the gem gluing process.
Start with small dark or light blue gems and as you go down the wire/ribbon/string use medium sized gems of the same color and end with a large gem next to the heart.
This ends up looking like rain droplets!

Step Seven~
Use your scissors to snip a small hole on either size on the top of your cloud and use ribbon or yarn to create an arch so you can actually hang your new creation up.
And you're done!


OPTIONS!
~ For a sentimental touch, write the names of those you care about on the hearts, or attach a picture. It'll make you smile every time you glace at it and remember the good times with the ones you love the most.
~ You can also add small pictures of friends and family to the hearts.
~ Instead of hearts, you can always use raindrops if you feel this is a bit to 'Valentine's Day' looking.
~ Create a kawaii face on the cloud. Eyes open or closed, it'll be adorable!
Thanks for reading! I hope you give this project a try.
Let me know what you think in the comments below or on Facebook. You can also get ahold of me directly by either e-mail or commenting in the box to the right of your screen. I'll comment back or answer any questions you may have.
Kat
HAPPY EASTER!
This month is all about April Showers and more importantly, Rain. I got this cute idea for a rain cloud wall decoration and it won't cost more than $5-ish. $10 if you follow the steps needing rhinestones.
This project was supposed to be simple with 7 easy to follow steps, but I swear by the time it was all finished it turned out tons cuter than I had originally planed and a whole lot more complicated. By the end it took four hands and quick timing.
But two hands will work just fine with no issues ^_^
Here we go.
What you'll Need :
* White Felt
* Red Felt
OR
* Red Colored Paper
* Ribbon/Gold Wire
* Glue (Use whatever glue will work with Felt. I am going to use Hot glue. But if you got with hot glue, use a low heat or it will melt acrylic felt.)
*Flatback Rhinestones in multiple sizes
*Ribbon
Step One~
One the white felt, draw a cloud shape. You can free hand this or use a template. Google has some really cute templates for rain clouds if you'd feel more confident doing it that way. I did mine free hand.
Step Two~
Cut out the cloud and marvel at the fact that yes, it's a cloud. This is a very important step, so don't skip it ^_~
As long as it's puffy, it doesn't have to be perfect. Clouds aren't perfect either. Have fun with it.
Step Three~
Cut hearts out of the Red Felt/Red Colored Paper. You can either make them all the same size, or different sizes. I went with multi sizes for a bit of fun.
This is how I did mine as I had no red colored paper. But I had a Copic Marker and that solved the issue nicely. ^_^
Step Four~
Cut your string/ribbon/wire you're using into different lengths, then glue them to the back of the cloud.
I used a small square of felt on the back of the cloud to secure the wires down. I was told this was a good was to keep everything together forever!
If you'll notice I used Hot Glue to make sure everything stayed and when I flipped the cloud over I found out that the felt squares holding the wires down could be seen through the white felt and looked like brown spots!
But I was able to fix that easily!
Here's my tip when crafting, and it's something I tell everyone and honestly believe. ALWAYS, always always always, expect the unexpected and make more of things than you need.
I made more hearts than I needed thank goodness, so I was able to cover up those brown spots, but I was short one, so a bit of ribbon and a 8MM/10MM flat back stone fixed that problem nicely and it added a little something extra.
Step Five~
Glue the hearts to the end of the string/yarn and wait for them to dry. At this point, I would apply a hard backed book or something else just as flat and heavy to keep everything connected till it dries unless you are using Hot Glue, which dries very very fast, so set your hearts just right, you won't get a lot of time to realign them.
Again, I sealed the wires with a small square of felt, but that step is optional.
Step Six~
This is wear is was going to end, but with a little encouragement and a great idea from my friend Jenee from JunkyAlchemy, I went a bit further but this step and everything after doesn't need to be done to enjoy your new wall decoration.
This is where I needed an extra set of hands, and things got a bit crazy. If ya'll didn't know this, Hot Glue dries the moment you look away from it. So if you don't have to use hot glue for this step don't. Instead use something equally strong like E-6000, but you might need to take it slower with the gem gluing process.
Start with small dark or light blue gems and as you go down the wire/ribbon/string use medium sized gems of the same color and end with a large gem next to the heart.
This ends up looking like rain droplets!
Step Seven~
Use your scissors to snip a small hole on either size on the top of your cloud and use ribbon or yarn to create an arch so you can actually hang your new creation up.
And you're done!
OPTIONS!
~ For a sentimental touch, write the names of those you care about on the hearts, or attach a picture. It'll make you smile every time you glace at it and remember the good times with the ones you love the most.
~ You can also add small pictures of friends and family to the hearts.
~ Instead of hearts, you can always use raindrops if you feel this is a bit to 'Valentine's Day' looking.
~ Create a kawaii face on the cloud. Eyes open or closed, it'll be adorable!
Thanks for reading! I hope you give this project a try.
Let me know what you think in the comments below or on Facebook. You can also get ahold of me directly by either e-mail or commenting in the box to the right of your screen. I'll comment back or answer any questions you may have.
Kat


.png)
.jpg)
.jpg)
.jpg)


.png)
.jpg)
