Showing posts with label Deco. Show all posts

Saturday, March 22, 2014

Getting Organized : Deco Storage

 Hello Lovelies~

     Now that it's spring, it's time for me to do some spring cleaning. I'm generally a 'Put it somewhere and that's where it goes, Don't move it.' Type. And that tends to lead to a very messy life, even if I know where everything is.

So today I have separated laundry and then decided to finally reorganize my Deco Box.

 Here it is before~


As you can see it is very full and below is what I needed to fit in there.


Usually, I keep all of my Nail Art supplies in the bottom section of my box, but why let all of this space go to waste?


I divided my acrylic pieces into separate bags and put them into the bottom section. There just wasn't room for them on the top.


Then I was able to put all of my new pieces and parts into their new compartments ^_^  I even have a free spot up at the top to keep specific parts together while I'm working on projects!


I have a lot more things to organize and clean, but one step at a time, or so they say. I think my next project will be my jewelry...

 Thanks for reading!!

Kat

Monday, April 29, 2013

Makeup Brushes that Sparkle!

Hello Lovelies~

 Over the last year I have been trying to add cuteness to my life though DIY. Right now I am making my makeup brushes more exciting. It makes me really happy to do my makeup when the first thing I reach for is a super cute makeup brush!

I'm going to show you three of my favorite brushes.

This is my face powder/finishing brush. I used a Large red heart as a focal point, and used a 'Everything But the Kitchen Sink' technique.


My next brush is my smudge brush. I don't use this one as much as my others, but it was way to pretty not to decorate. I did a striped pattern top and bottom, but let the middle open because I love the fuchsia color!


I did this one last night. It's not the design I planned on, and honestly, I'm going to have to be careful how I clean this brush, but it's so pretty!


Are ya'll doing any small DIY projects to make your routines a bit cuter? I'd love to hear about them if you are ^_^

Thursday, November 29, 2012

Lolita Blog Carnival : A DIY Gift Idea! (And Tutorial)

Hello Lovelies~


 LBC is going DIY this week and with the holidays right around the corner it's the perfect time of year to start pulling out your project book and pushing up your lacy wrist cuffs ladies and gentlemen.

This time of year can get out of hand, what with everyone is trying to out spend the other and the Jones's across the way putting up ANOTHER set of lights, we tend to get swept away and before we know it our purses at empty and we're to stressed out to think! Let alone wrap gifts or bake!

  But take a breath, grab a cup of tea and a hot glue gun, because I've got a simple gift idea that'll make crossing your friends off your holiday list!!!

This is a project for the shutterbugs out there! Or anyone with a handy camera or camera phone. Photos make great gifts! Be it a family photo you're sending to far away relatives, or a group shot with friends you want to share with the whole group so everyone will remember that time and place for years to come, it's a quick and inexpensive way to tell others you're thinking of them or that you miss them.

 But with the ease and convenience of digital photography, having real photos on hand is something almost novel. But I am a bit old fashioned and as much as I love my digital camera, I am often seen at my local walmart selecting pictures off of my sd card to have actual tangible photos of. $0.28 cents for a 5x6 photo in glossy or matte isn't bad at all!

Only....you can't just send a picture....well....you could. But Frames were created for a reason! You needn't spend a ton on a frame, we often spend more on the frame than we do the picture!. Instead run to your local dollar store and pick up a few frames and decorate them yourself!

 So here is what you'll need!

 - Hot Glue Gun and Glue Sticks
 - Picture Frame
 - Lace
 - Ribbon
 -Various Decorations

I already had all of this in my craft box or laying about my house, so this didn't cost me anything, but all together, this project shouldn't cost more than $10 with lots of extra left over to do three or four more frames if you like.


                   If you have a plastic frame like I do, be careful with the temp. of your glue gun.


First glue down your lace on the outside of the frame


       Then glue down your ribbon to the inside of the frame. If you have seams, it's ok. You can cover them later with decorations.


I don't have pictures for how I decorated the frame. I was on the phone with my mum at the time I was gluing everything down. I made the bow myself and the buttons on the bottom are from Holly Tea Time. To add a bit extra, I attached large flat back pearls to the other corners and I think they really pulled the whole thing together.


              Add your picture and it's done! Ta-dah!!!


So there it is. My frame might be a bit more cute than you want to go for, but everyone is different and that's what is so fun about DIY, it's completely customizable and personal!

 Thanks for reading this week and I hope you'll check out the rest of the LBC family and their awesome DIY ideas for the holidays.


Sparkle Girl

Let's Go!

A Life in Disguise

Lemontree

Spider Sugar

Pop Princess

Make Lovely

Monochrome Sparkle

Dollhouse Diaries

Saturday, August 11, 2012

It's Deco time!

Hello Lovelies~

 Here's the mail, it never fails.
 It makes me want to wag my tail.
 When it comes I want to wail! ~ Mail~~~~~~!

Lol!

 Today I woke up to find a treat in my mailbox ^_^

 Deco&Deco volume 4! ...to be honest, I don't remember ordering it. I thought I ordered the August 'Nail Up', but this is the magazine I really wanted, so I'm more than pleased with it.

Inside I found so much inspiration!!!!

  Step by step lessons in everything from rhinestone deco...


And look at the beautifully done pieces that others have made. They are so amazing!


To polymer clay and food deco!


Out of the whole magazine, this is the most amazing piece.


So that's my excitement of the day. I am off to read though and stare at lessons until I can make something as creative and imaginative ^_^

Tuesday, March 6, 2012

Catching up on the past few weeks

Hello Lovelies~

 I've been a bad blogger for the past few weeks. I'll be honest, I've felt very bland lately, I don't know why. The ability to write has eluded me! But I figured it happens to everyone and if I didn't get over this small bump in the road I would forever be stalled. So here I am working though this terrible blogging block!

Currently, I am watching the first season of 'Pretty Little Liars' again, a show I have fallen in love with and completely blame on my Francis when I had been avoiding it so well ^_~*. I am debating on getting the books. Unsure if my love of the show will be corrupted when I find things that don't match up as is inevitable ^^;

 Speaking of books, I finished 'Cinder', the book I was reading for my 50 book challenge. It was a great book. I finished it in like...a week! It was so hard to put down and I enjoyed every moment of it. The only issue I had with it is that it basically completed the story of Cinderella and now it has gone in a strange direction. Not a bad one mind you, but a strange one.

So! 'Cinder' is done and I am now reading something completely out of my usual realm of reading material. But I am currently reading, 'Storm Front', which is part of 'The Dresden Files' series written by Jim Butcher. When I am done with the book I plan on getting the audio book.


 O.o? I bet some of you are asking yourselves why have both, right? Lol

'Storm Front' is read by James Marsters! ... I have a mild obsession with him and have since he was Spike in 'Buffy the Vampire Slayer'.

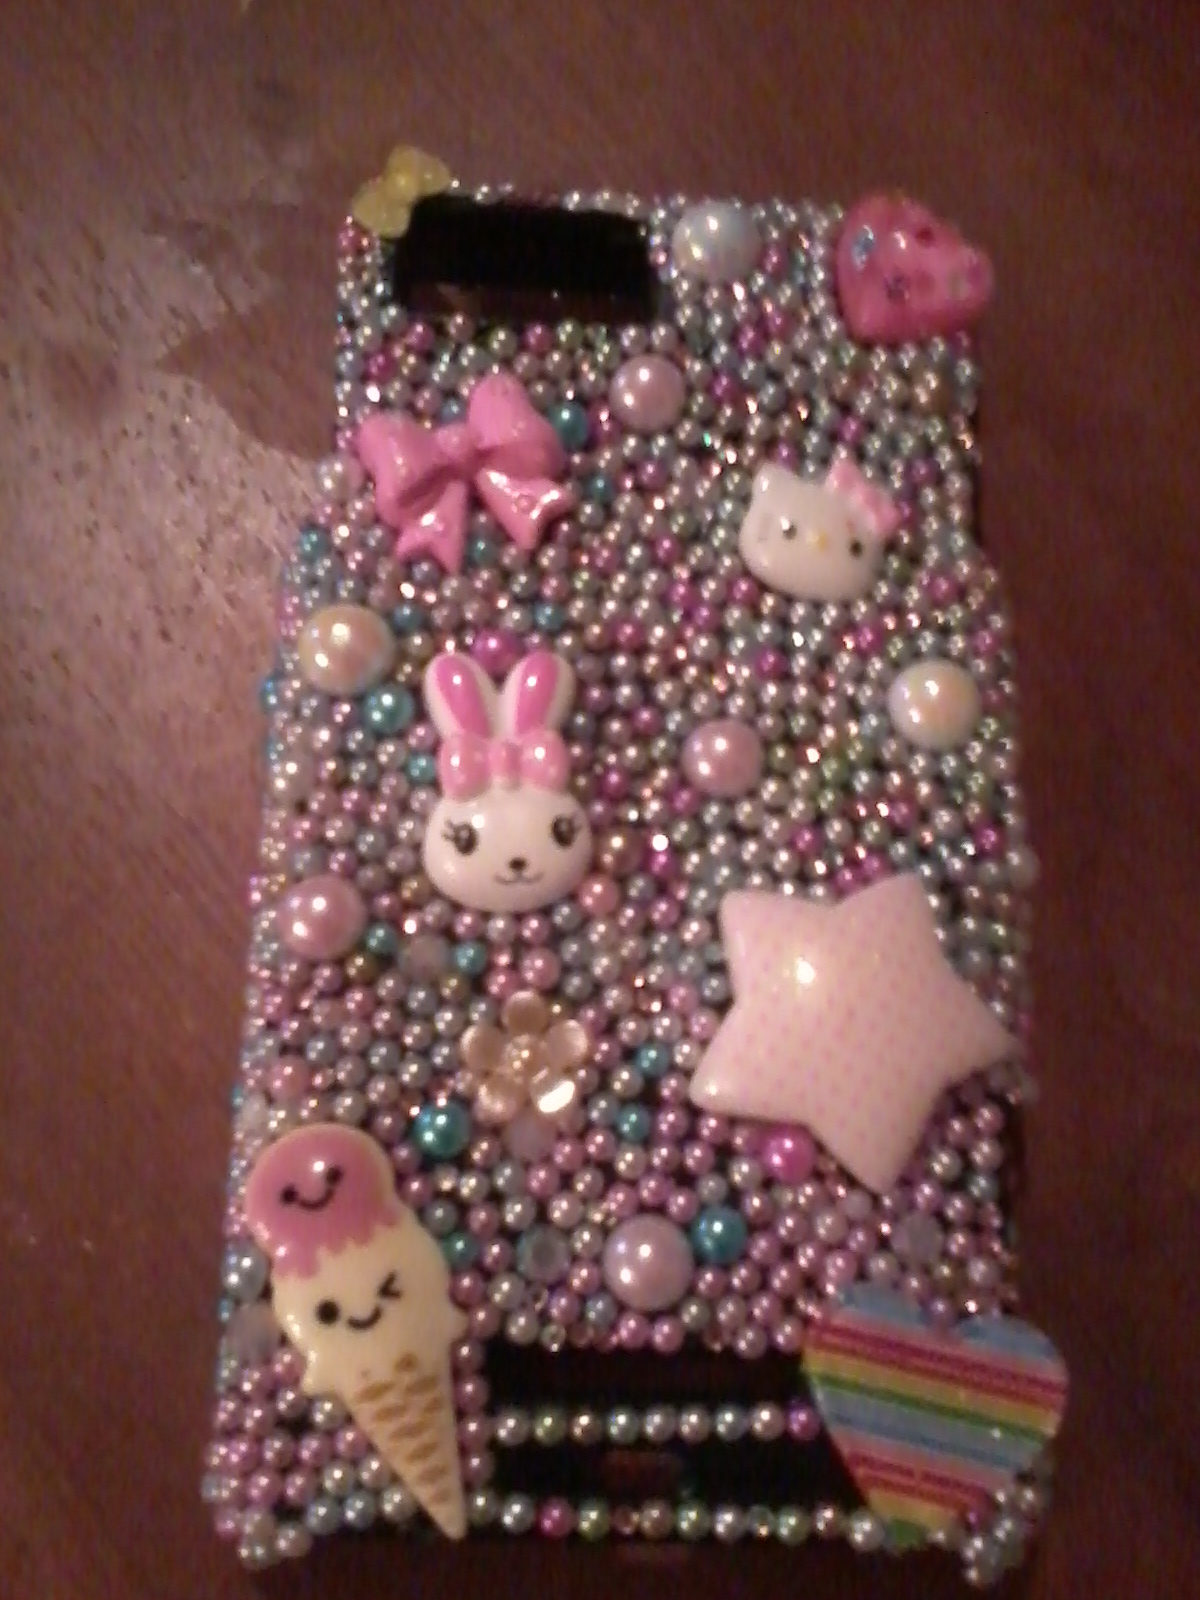
 Other than reading new books and watching much loved shows, I have been doing Deco! Lol I finished me friend's cell phone...

Here is a picture of it half done...


From here I decided I didn't like the blue kitty or the gold pearl in the upper left hand corner, so here is the finished product~!


I replaced the blue kitty with a small Hello Kitty charm and the gold pearl with a small yellow bow. I really like how this turned out. ^_^

 I was so pleased with how this turned out, I wanted to redo my phone, so this is the fist picture of my newly started design....it's not done, but in a week or so it'll look rockin'!!!


Cute, right? It'll be all pink when I'm done.

 So, that's it ^_^ That's what I've been up to lately. I hope to get back to a regular posting schedule in the next week.

Friday, October 14, 2011

New Deco Supplies!!

Hello Lovelies~

 I am so excited! Today I received a great suprise when I woke up. Laying on my door step was a package I've been waiting for from my favorite Deco supply site, FULLMOON. Yuki is amazing. She responds quickly to any questions and sends out your order the day after she gets your payment.

In this order I received : 2 packages of 1000pc 2mm Clear Rhinstones
                                     1 package of 1000pc 2mm Light Pink Rhinstones
                                     2 small pink bows
                                     2 small black bows
                                     1 small Coco Chanel charm
                                     1 medium Coco Chanel logo

And now the pictures!


And I was shocked to see a special treat inside...


A free gift!


I received 1 clear heart, 1 pink heart, 8mm royal blue rhinstones, and 8mm beaded gold stars!

 I can't wait to finish the project I've been working on for my friend....


I got halfway through her phone case and ran out of rhinstones! So now I can finish  ^_^ ~*

                                                         And I did!


Tadah! I'm so proud of this ^_^

Tuesday, October 4, 2011

Sunglasses Deco Project

Hello Lovlies~

 I have been big into Deco lately. After I did my phone a few weeks ago my mother loved it so much that she insisted I do her sunglasses as well. So I pulled out my box of tricks and got to work.


These are what I started with and this.....


Is what I ended with ^_^

 I used all purple rhinstones of various sizes and after two weeks of bumpping around my mom's purse, all of the stones ar still in place! I am so pleased with the Alleen's tacky glue.

Tuesday, September 6, 2011

Make it Cute!

Hello Lovelies~

 Recently my Mom and I got new phones and the look exactly alike!!! They are both blue, both smart phones, and neither one of them has a place for cell phone charms so there was no way to tell them apart....until we got them home ^_~

After popping in a good t.v. series, I pulled out my Deco box and got to work!


As you can see from my collection, I don't have whipped cream pieces or lots of roses, but I do have some favored cabochons I've been hording and I figured no was the best time to use them.

 I usually use a Japanese silicone based glue, but I ran out of it last Christmas and haven't gotten any more, so this is the first time I am using an American 'All Purpose' for my Deco project.


Allen's Original Tacky Glue...It takes a while to dry, but it's doing well so far.


First, I started by positioning and laying out where I wanted the bigger pieces to go, they are the focal point of the design, so it's imperative that you know where you want them before you glue them, because once they are glued, you don't get a second chance.

 I then placed the larger pearls and rhinestones about to give the design a more varied look.


Awkward looking so far, isn't it?

Then came the tons and tons of tiny multi-colored flat back pearls to fill in the body of the phone.


                                                                           TA DAH!!!!! 

 It was lots of work and took three hours to finish, but I am so proud of the end result that I can't wait to get more pearls and work on my DS!

Monday, August 8, 2011

Just Showing off the Nail Art!

Hello Lovelies~

 There wasn't a lot going on this weekend, but I wanted to show off a set of nails I made a few months ago and wore to ConStellation, a local Scifi con here in Nebraska. Sadly I didn't sow them off back when I wore them for the first time, But I recently wore the entire outfit again and thought I'd share the nails with you this time.


The base color is China Glaze's 'For Audrey', which is one of my favorite colors to wear ever!

 That's it for my quick update! I hope you had a great weekend!

Kat

LinkWithin

Related Posts Plugin for WordPress, Blogger...