Friday, June 20, 2014

06-18-14 Outfit Of The Day and Mini Haul!

Hello Lovelies~

 Just the other day I caught a wonderful sale while out shopping with my friend Al. I love a good sale and I can never pass up clothes that are 50% off clearance! If you follow me on Instagram you'll remember having seen the new skirt I got a week or so ago and I finally got to wear it!

I didn't know how I was going mix it in with my clothes. I mean, most of the stuff I own just doesn't go with Hot Pink and Leopard Print, but I fell love with this skirt the moment I laid eyes on it and just had to have it.

 So before I show you what I got yesterday, I'm going to show off the evolution of my outfit!


If I hadn't been taking pictures, I'd have just settled with draft of the outfit. It's not bad, but Not good at all. I thought the pinks would go and be cute together and in the mirror it was! But on film....not so much. So off with the shirt.

 NEXT!


Then I thought a solid colored shirt would work well, but seems I've lost enough weight that this shirt now looks frumpy on me and tucking it in looked worse. Not to mention that it made the skirt, which I wanted to highlight, just ...There and rather be the star of the show, it looked out of place, so this too was rejected.

 NEXT!!!


Whoever 'They' are, they're right. Third time's a charm and I really loved this final product. In the beginning I was worried about mixing my patterns, seeing as the Putumayo top had pink and grey stripes and a decal, but the mixed well and I felt awesome.

 While it's not my normal frills, super dressy or casual, I loved it and even wore my Metamorphose headbow to tie it all together.

I truly felt like I could've been in a 'Kera' street snap yesterday. It's not pictured, but after I found the right outfit, I did do my makeup, but it's wasn't wild or crazy, just simple and done with pinks ^_~


Top: Putumayo
Skirt: City Streets
Pants: Yoga pants (No idea where I got them)
Shoes: Black Mary Janes (Got them at DSW)
Headbow: Metamorphose
Necklace: No idea (It was a gift)


 I don't have a lot of money coming in right now, so to feed my shopping habit, which I usually keep a very tight reign on, I have been shopping at the local 'Second Life' shop for 'On Trend' type clothing called 'Plato's Closet'.

When I first heard of them, years ago, I was much to big to even fit the occasional 2X the sell there, but No I am wearing 1X-2X and am very please with myself and can now browse with my friend and don't just dream of wearing the cute clothes I find.

 Here is what I found this time!

This Top is originally from Forever 21. It's a 3X, but their sizes run small and for $3, marked down from $6, I figured why not?

 It's soft and flowy. Half cotton, Half chiffon, and poka-dots! How cute!


My favorite part is the Peter Pan type collar and the gold rimmed buttons. This can be worn for casually, on an interview, or even a date. The designer of this shirt really did a great job.


Next is this super cute gold skirt. It's on an elastic band that's shot through with gold threads and the whole thing bounces and has great movement. I tried it on when I bought my pink skirt, but passed it up due to budget.

 This skirt was originally $8. I bought it for $4, only to find out it had it's original tag on it and was first bought for $44! This was an AWESOME deal!


And finally we come to my impulse buy. Anyone who knows me knows I carry my life with me in my purse. The bigger the better! But when checking out I looked over and saw this beauty and just knew I had to have it!

 Originally sold for $8, I bought it for $4 and it's so pretty! It'll go very nicely with a Hime outfit I've been buying pieces for for a year or so now.


 And that's it for my Mini Haul!

 All together I spent $11.45 and I think it was well spent. I am so excited to add these to my collection of Non-Lolita, But Still Cute! clothes.

Thanks for reading! Make sure to stay in touch!

Facebook : Kathleen Sweitzer
Twitter: Angelshinigami
Instagram : Rosesandcream
Tumblr : Livinglolita

Friday, June 13, 2014

Food Friday ~ Hello Kitty BLTs

Hello Lovelies~

 I'm sure some of you have seen these online or in stores, some of you may even own one, which I know at least one of you does ^_~

Today I am showing off my Hello Kitty Toaster!

 I've had it for a long time, but am only now getting around to opening it and using it. And I love it!!!

Feel my love through the pictures I couldn't stop taking!


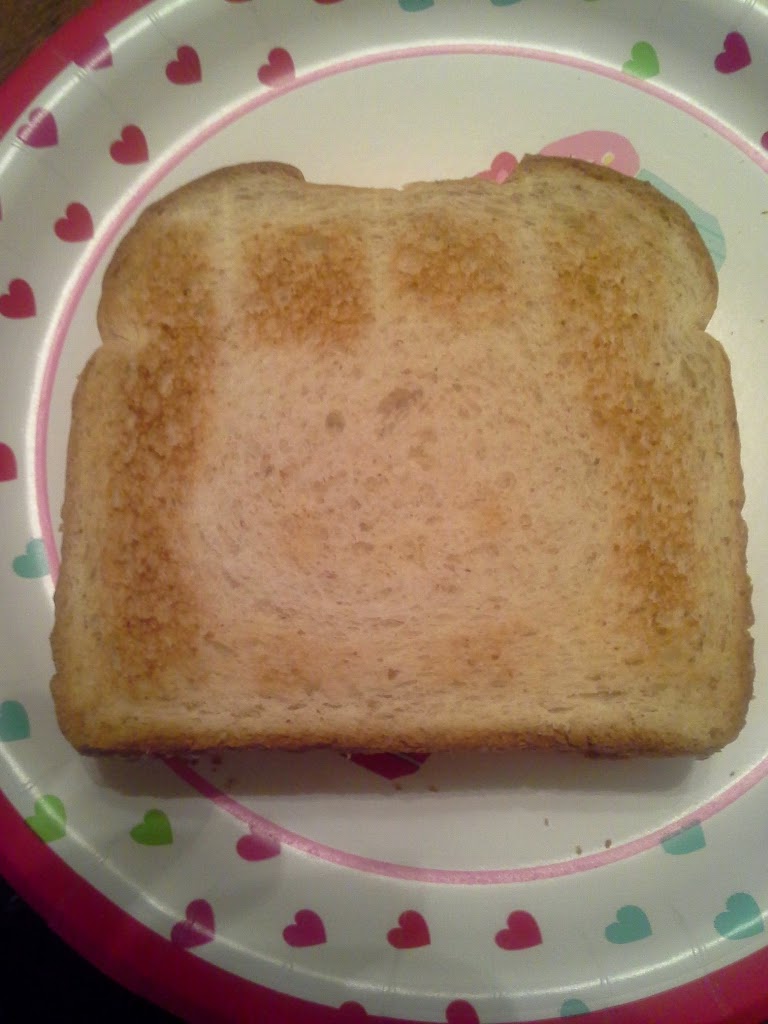
This was on the '2' setting, as you can see, it toasted well, but no Hello Kitty.


This was on the '3' setting, as you can see it toasted to well and there IS a Hello Kitty!
 

                                              '2' and a smidge resulted in Kitty's eyes.


                                                    And '2.5' was dark, but still edible!


After all of the Toast was made, we decided to make Triple Decker BLTs! They were SO good.

 I hope you enjoy your Food Friday and celebrate the Full Moon Tonight! Pet all black cat you see and tell them they are beautiful! (It combats the bad luck ^_~)

Thanks for reading!

Thursday, June 12, 2014

Product Review ~Organix Coconut Milk Anti-Breakage Serum


Hello Lovelies~

 A few weeks ago, my friend brought me a gift as a housewarming of sorts and I was very excited because I usually see products like this and long for them, but pass them by as to expensive...but then buy a $30 DVD. >.>....Yeah. You can see where my priorities tend to lie.

This is 'Coconut Milk Anti-Breakage Serum' by Organix. It is Sulfate free, Helps to repair damaged hair, and mend split ends and frizziness, which happen to all hair types, but is particularly bad when you have curls or strong waves.

Organix Coconut Milk adds strength and elasticity to weak, brittle, and damaged hair. It helps protect longer hair by reducing everyday damage and has unique blend of organic coconut oil and silk and keratin protein to instantly repair dry, damaged, coarse and chemically treated hair.

 Sounds like a Miracle in a Bottle, doesn't it?  But does this product really do all that it claims? If it does I will build it an alter.

In the last few month my hair has become sad and flat and I am getting split ends. It's falling out and breaking much to easily....it makes me want to cry most days.

 I've been trying DIY hair masks, leave in conditioners, hot oil, noting was working to get moisture back in and repair the brittle-ness. So when I got the Organix, which promises such amazing things, I figured 'Why not? Nothing to Lose'.

I've been using it for a week now and I must say, while it hasn't been the bottled Phoenix Feathers it claims to be, it has made a visible difference.

 Was it heavy?

  No, but it wasn't weightless either. It was a nice light weight styling product that smooths through hair nicely but takes a bit to wash the residue off your hands.

4/5

How is it Packaged?

 This may not be a big question for you, but it is for me. Glass bottles, while cool, don't tend to be reusable and when they are done we throw them away (I always forget to recycle) to be filler in a trash heap somewhere which isn't good for the environment.

But Organix bottles are eco-friendly. Each manufactured from recycled materials. So no matter what, whether it's recycled or thrown away, it's not going to harm the environment

 .(Organix is also a Animal testing free company so that is a big bonus for me!)

5/5


How Does is Smell?

 What's the first thing you do after looking at the package and reading the instruction? That's right, you smell it. But some products you have to buy blind due to seals and all that so you get it home and it smells like death and dying or chemical sweet....

But this Coconut Milk Serum smells like the beach and tanning lotion. It's tropical and is perfect for those of us who have to lay by a concert pool and dream of the ocean.

5/5


What Does it Cost?

 I wasn't expecting this product to be less than $12.50. I really wasn't. But When I went searching online, I found it available on multiple sites for $6.99.

$6.99 for 4 fluid ounces. that'll last 5 months or so with every other day use. Not bad at all.  

 5/5


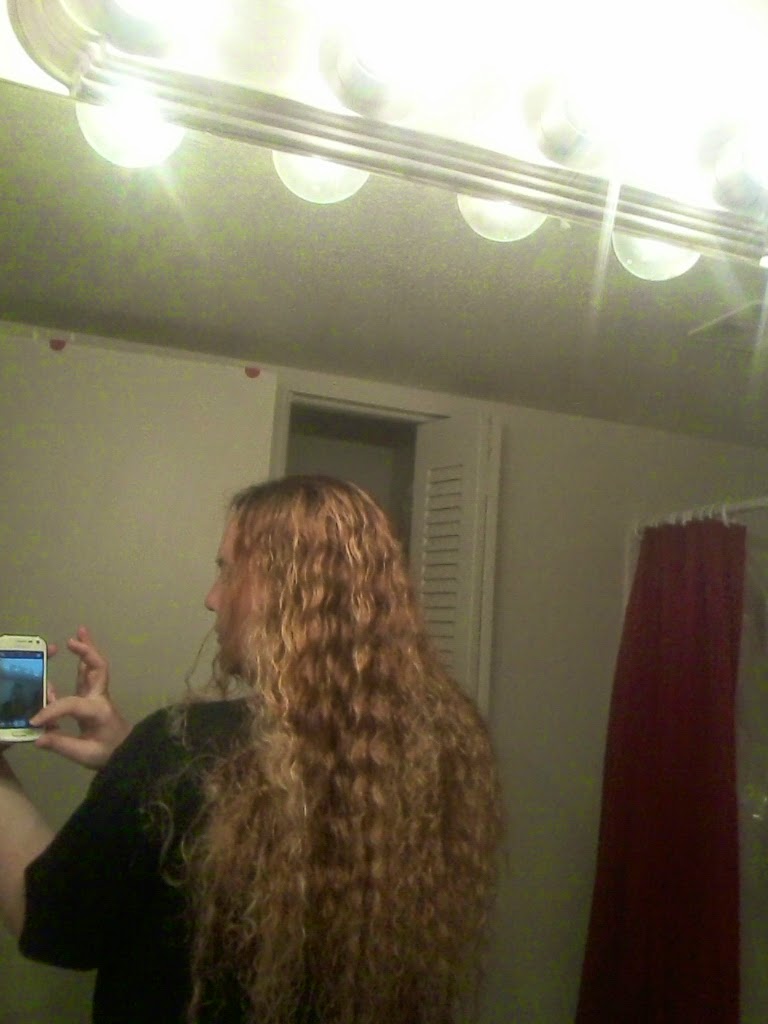
                         My hair last week when I wasn't using the Organix Serum.


                                        My hair after using the Serum or four days.


My hair is softer and stronger than before. After four days I already have less hair wrapped around my pony tail holders and in my hair brush. I am looking forward to good things as times goes on.


Over All! ~ 4.5/5

Recommended!!!

I will be getting this again. I think it'll stay in my hair care regime for a long time to come.

 Thanks for reading!


Tuesday, June 10, 2014

Crafternoon and Project Progress

Hello Lovelies~

 As of two days ago I hit 50,000 page views and I wanted to thank All of you! Without you, my wonderful wonderful readers and friends, Simple and Sweet wouldn't be what it is. We still have more growing to do, but as we stretch our wings and fly, know that we fly together!

Yesterday I spent the day crafting with my friend Al and we worked on old T-shirts. Turning the old or ruined clothes into something new and awesome.

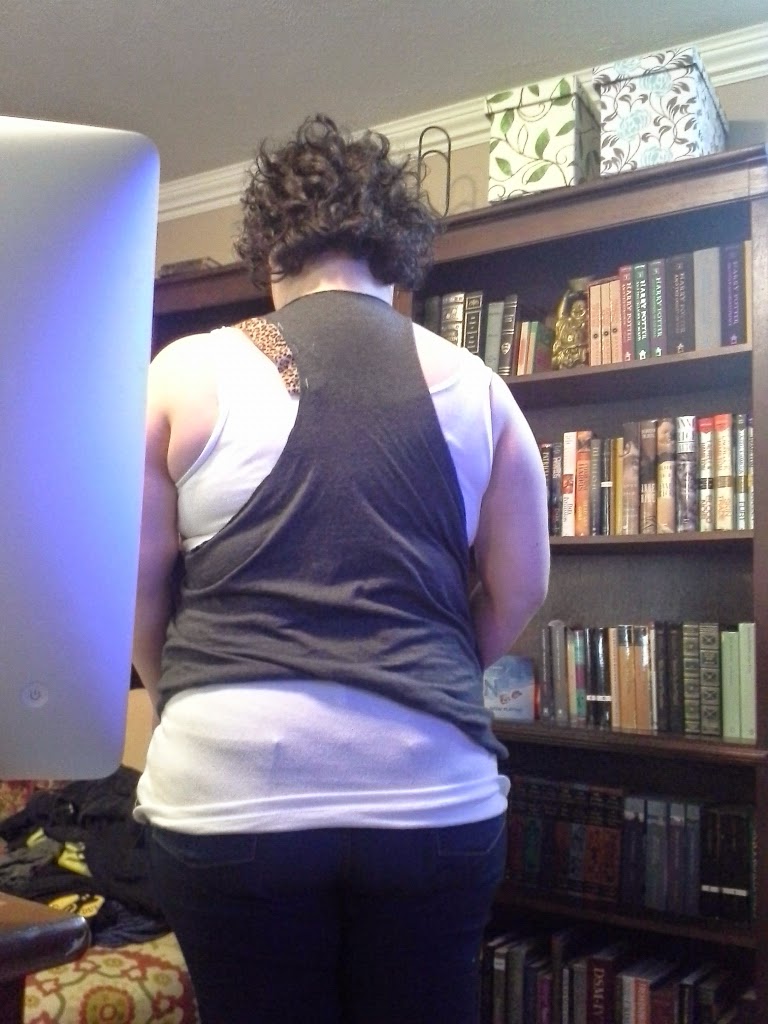
Our previous Craft day, Al took her old Dead Pool shirt and turned it into a tank top, but she felt is still needed something. So we went to work.

 Originally, she was going to add an inch and a half of leopard print all the way around the arm holes, but she didn't end up liking that, so it was changed.


As you can see above, slightly, she cut off the straps and added leopard print straps instead. Which actually look really cool. We have one more craft day before it's done, but I think it looks way cool.

 We also discovered that knit is forgiving and a Stapler can be used as an Automatic Pinner. Really, we couldn't find any pins, so we used the stapler and liked it.


This is my project. As you can see below, I have a hole in one of my favorite shirts. I've had it for a long time and the hole is large and unfixable. So I decided to cut a curved triangle out of the front and add a cute ruffled panel of blue fabric with a light blue bow that will match the decal on the shirt.


Yeah.....I didn't like it at all. It took two and a half hours of staring at this shirt trying o decide what I didn't like about it until I realized the refashion I wanted to do wasn't really my style.

 So I took a step back from the original design and re-evaluated my fabric options and made something much more me.


The thin bands around the waist, the arms, the collar, and the bottom of the skirt will be done in black leather, which will be the only fabric I'll need to buy.

 I might want to add bows to the sleeves as well, and maybe turn them into puffy sleeves, but I'm going to do everything else first and the sleeves will be a game day decision, so to speak.

Thanks for reading! And Thanks for helping Simple and Sweet reach this very cool milestone!

 Don't forget to be friends with me on various social media sites including~

Facebook : Kathleen Sweitzer
Instagram: Rosesandcream
Twitter: Angelshinigami
Tumblr: Livinglolita  

Sunday, June 8, 2014

Life Update and International Lolita Day rundown!

Hello Lovelies~

 May is gone, June is here, and things have changed once more for me, which is why I disappeared through the month of flowers. I have moved once more and am now living with a good friend of mine and watching her little girl for the summer. If you follow me on Facebook or Instagram you're sure to see her in the background of some on my pictures. The girl isn't just a Ham, she's the whole Christmas Dinner.

I'm writing again. I joined and RP last year and recently stopped lurking an joined in the fun. Now all of my literary creative juices are flowing and I feel so energized it's kind of crazy. But that might also be because Summer is here and I love summer.

 Swimming, sun, cooking out. What's not to love? This is the perfect season to scale back the layers and bean the rules till they melt in the heat. Casual Lolita is easier to do in the summer and it's even ok to rock the short styled skirt that AP promotes from collection to collection when the print suits.

The Dark Eye Shadow Tutorial I promised is on it's way, along with a Makeup Brush Deco tutorial I promised a lovely reader who asked for it in the Comment Box on the side bar to the right. Though if you comment or ask questions with that, please remember to put the title of the post in there some how. I discovered the hard way that it is a direct link to me, but is an independent widget, thus it isn't connected to the Post at all, but to the Blog itself.

 ^-^; Silly me, but you live and learn.

Yesterday was International Lolita Day! (YAY!!!!) I hope ya'll had fun and did something to celebrate, even if it was just something small like wearing a bow and curling your hair or wearing Mary Janes when you usually wear sneakers or something.

 I happened to be invited to the Zoo though a strange conversation that started off as plans for other people, then morphed into combined plans, then different plans, then just all types of plans were made! But the Zoo plans fell perfectly.

When I got dressed I hadn't planned on rain, but by the time we got to the Zoo it was Pouring! It cleared up later in the day, but still. Rain on ILD.

  It was a good thing I brought one of my parasols. If you ever get a chance to get one, I recommend it. Especially one that can double as an umbrella. They are so useful for zoo trips. 7 hours in and out of the sun and I am not burned any more than I was the day before.

We didn't see everything, our Zoo is huge! But we got a good bit accomplished and even got to ride the carousel! No pictures sadly, my phone died in the middle of the trip, but I did get tons of pictures in the aquarium! FISH!!

 All of those will be a separate post. I took lots of pictures there. ^-^;

And we rode the train around the back half to see even more animals, because I don't think we'd have made it if we'd have been walking with four kids, a stroller and a wagon, each containing a child and food. o.o

 The day was finished off with an early birthday celebration for my lovely roommate. We had Pork Ribs smoked to perfection with mashed potatoes, gravy, biscuits, grilled Asparagus, and grilled pineapple (of which I only had one small square to try, but didn't eat more so I could avoid my stupid allergy from kicking in, despite the Grilled Pineapple being one of the more delicious things ever!)

I had a blast and it was a wonderful way to celebrate ILD. I now have wonderful new memories and stories to tell.

Now on to my outfit for the day!

I only got Selfies of myself through the day, so this photo was taken later.


Dress: Metamorphose
Socks: Metamorphose
Shoes: Off-Brand but Cute As Hell
Headbow: Metamorphose
Parasol: Metamorphose (Not pictured)

 Yes, this is an outfit you've seen me in before, but It's super comfortable for a day out and about and walking and this time, rather than adding the two Petticoats I usually wear with all of my dresses, I went without it as this dress has a built in petti.


This is an older dress, so it has a traditional Old School feel to it, shape and colors, but I love it. I have a large chest, 50" inches and it could go at least four inches larger. I love Meta dresses for this reason.


I've always had a thing for fish. Aquariums are my favorite attraction of anywhere I go, but after reading and watching 'Princess Jellyfish' I have come to appreciate Jellies all the more. So I took a picture with one!


More Jellyfish pictures later, but for now. Thanks for reading! Follow me on all of my social networking sites for more pictures, updates, and faster updates. I am even posting on my Tumblr now! But that is more for my Everything I think is awesome moods, including Shows I'm watching, Fics I'm reading, Geeky memes I find funny, Stuff like that.

 Let me know in the comments below what you did for ILD! (Even if you just took a Nap ^_^ ) Happy Monday!

Facebook: Kathleen Sweitzer (please message with 'Sweet and Simple' so I know to add you)
Instagram: Rosesandcream
Twitter: Angelshinigami
Tumblr: livinglolita

Saturday, May 3, 2014

Makeup Confessionals~ Black Eye Shadow and Me

Hello Lovelies~

 I love makeup. Period, end of story. I love it. I used to sit at my mum's side when she would get ready for a date and watch her peruse her vast collection of colors and liners and everything from liquid to solid and I knew the first time she put it on me that I would never be the same again. She taught me everything she knew, going through each step every time she did her make up, they are some of my fondest memories from my childhood.

And while I had the passion for makeup even way back when, I didn't start actively wearing makeup until I was in middle school, and then for awhile I collected lipsticks, but never wore them until my senior year in high school.

 By that point it was relearning how to ride a bike. I hadn't forgotten, but I didn't have any finesse with it either and I was Goth adjacent, Tripp skirts, thigh highs, and heavy eyeliner, oh the joys of the early 2000's.

But the one thing I never learned how to do was apply Black eye shadow. I know! Right? Goth girl who never wore black eye shadow. Pretty rare for back then, but it seemed silly on me and always smeared into a big mess, making me look like I had been hit a few times after far to little sleep.

 So I tried it once and never tried it again. That's it!

'All that for a lousy 'I don't know how to put on black eye shadow'?!

 Yes. Honestly, I've always felt like I was just a step to the left of "Getting It" because of my lacking in this area. The Smokey eye trend came in and I never even attempted it because of my general fear of darker saturated pigments that smear everywhere, even with a good primer.

So Today I was getting ready to for to Free Comic Book Day and I was putting on a dress I usually pair with various pinks and a black eyeliner when I stopped.

 'Why not try something new today?' I thought. It's not like if I didn't like it I couldn't take it off and start over. So I bravely reached for the up opened trio of black, grey, and light silver I got in an Ipsy bag months ago and got to work.

This is the result of hard work and determination to get it right.


I wish I had taken more pictures of just my eyes. I am really proud of how they came out! I'm going to attempt to do this look again on my youtube channel, which will be posted here and on my facebook as well, so look out for that.

  I never thought I would be one for dark eye shadow. I always wanted to brighten my eyes rather than darken them, fearing they would end up looking small, but the black and grey look was really pretty and I think when done right, it's a stunning, head turning look.

Thanks for reading!

 Kat

Sunday, April 20, 2014

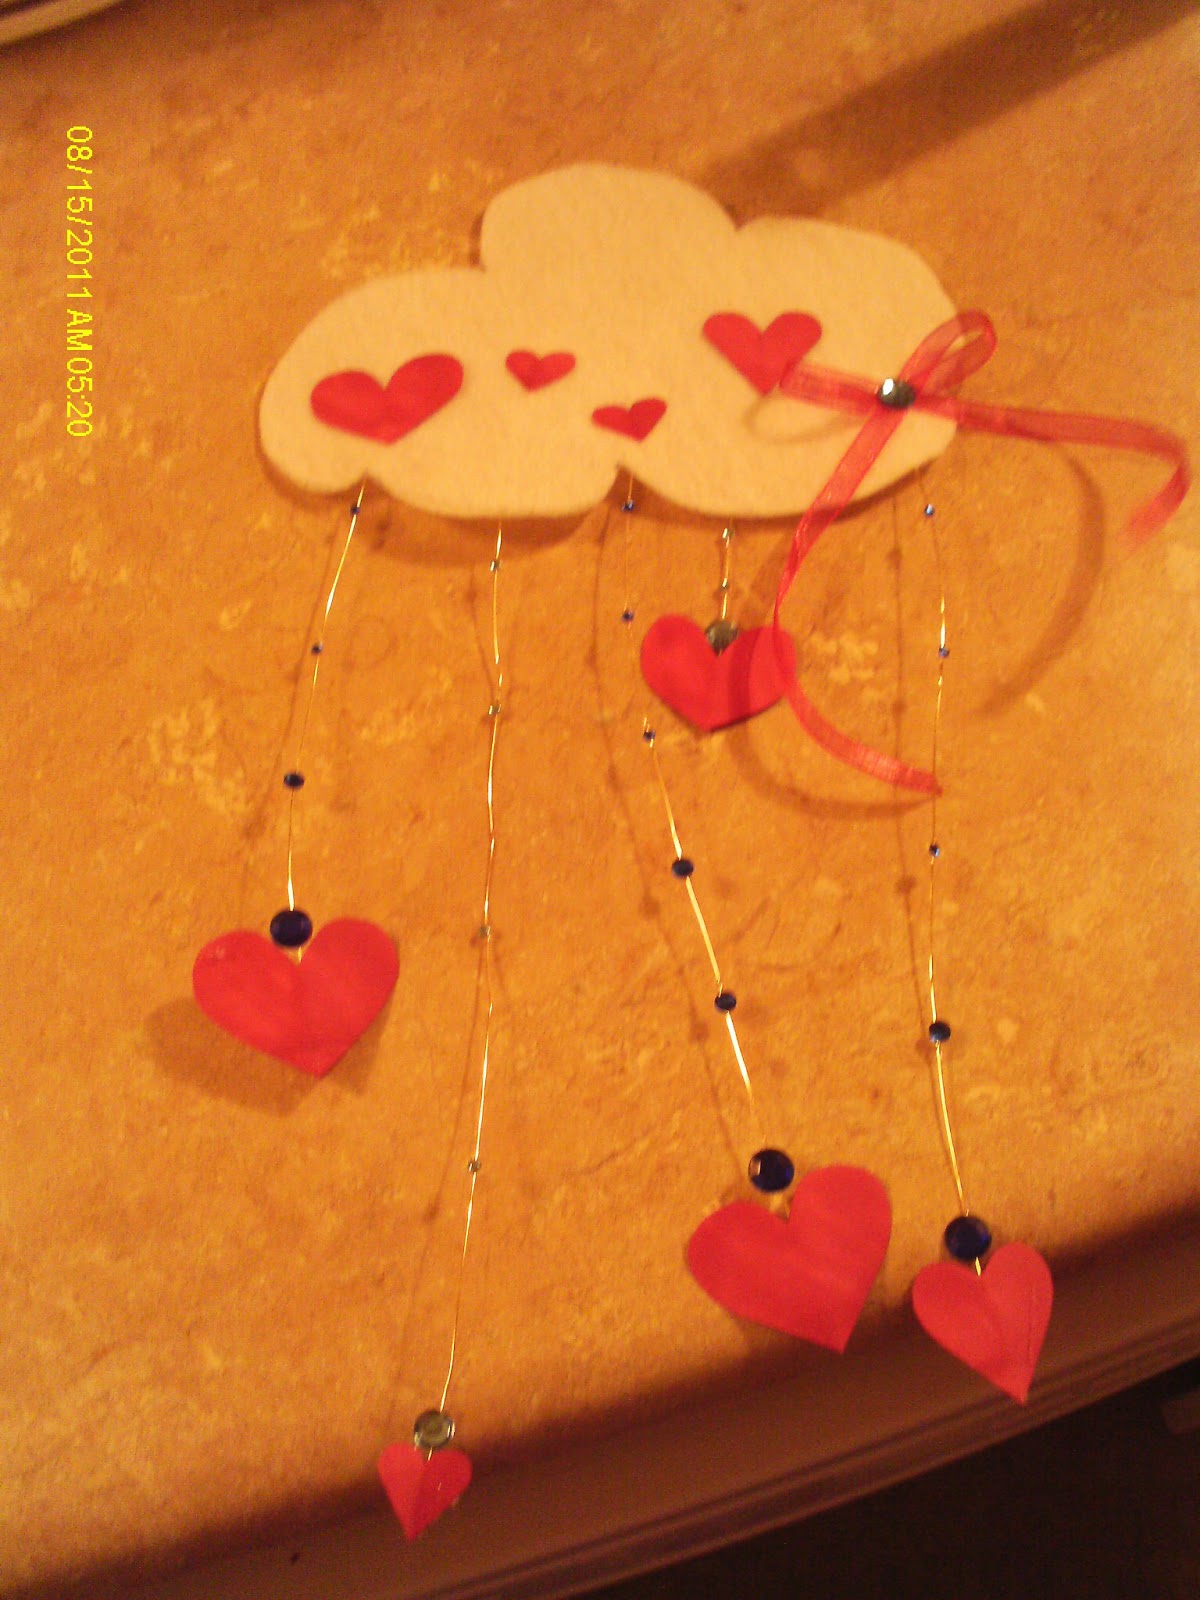
April Showers Wall Decoration ~ DIY

Hello Lovelies~

HAPPY EASTER!

 This month is all about April Showers and more importantly, Rain. I got this cute idea for a rain cloud wall decoration and it won't cost more than $5-ish. $10 if you follow the steps needing rhinestones.

This project was supposed to be simple with 7 easy to follow steps, but I swear by the time it was all finished it turned out tons cuter than I had originally planed and a whole lot more complicated. By the end it took four hands and quick timing.

 But two hands will work just fine with no issues ^_^

Here we go.

What you'll Need :

    * White Felt
    * Red Felt
         OR
    * Red Colored Paper
    * Ribbon/Gold Wire
    * Glue (Use whatever glue will work with Felt. I am going to use Hot glue. But if you got with hot glue, use a low heat or it will melt acrylic felt.)
    *Flatback Rhinestones in multiple sizes
    *Ribbon

Step One~

 One the white felt, draw a cloud shape. You can free hand this or use a template. Google has some really cute templates for rain clouds if you'd feel more confident doing it that way. I did mine free hand.


Step Two~

 Cut out the cloud and marvel at the fact that yes, it's a cloud. This is a very important step, so don't skip it ^_~

As long as it's puffy, it doesn't have to be perfect. Clouds aren't perfect either. Have fun with it.


Step Three~

 Cut hearts out of the Red Felt/Red Colored Paper. You can either make them all the same size, or different sizes. I went with multi sizes for a bit of fun.

This is how I did mine as I had no red colored paper. But I had a Copic Marker and that solved the issue nicely. ^_^


Step Four~

 Cut your string/ribbon/wire you're using into different lengths, then glue them to the back of the cloud.


I used a small square of felt on the back of the cloud to secure the wires down. I was told this was a good was to keep everything together forever!


If you'll notice I used Hot Glue to make sure everything stayed and when I flipped the cloud over I found out that the felt squares holding the wires down could be seen through the white felt and looked like brown spots!


But I was able to fix that easily!

  Here's my tip when crafting, and it's something I tell everyone and honestly believe. ALWAYS, always always always, expect the unexpected and make more of things than you need.

I made more hearts than I needed thank goodness, so I was able to cover up those brown spots, but I was short one, so a bit of ribbon and a 8MM/10MM flat back stone fixed that problem nicely and it added a little something extra.


Step Five~

 Glue the hearts to the end of the string/yarn and wait for them to dry. At this point, I would apply a hard backed book or something else just as flat and heavy to keep everything connected till it dries unless you are using Hot Glue, which dries very very fast, so set your hearts just right, you won't get a lot of time to realign them.

Again, I sealed the wires with a small square of felt, but that step is optional.


Step Six~

 This is wear is was going to end, but with a little encouragement and a great idea from my friend Jenee from JunkyAlchemy, I went a bit further but this step and everything after doesn't need to be done to enjoy your new wall decoration.

This is where I needed an extra set of hands, and things got a bit crazy. If ya'll didn't know this, Hot Glue dries the moment you look away from it. So if you don't have to use hot glue for this step don't. Instead use something equally strong like E-6000, but you might need to take it slower with the gem gluing process.

 Start with small dark or light blue gems and as you go down the wire/ribbon/string use medium sized gems of the same color and end with a large gem next to the heart.

This ends up looking like rain droplets!


Step Seven~

 Use your scissors to snip a small hole on either size on the top of your cloud and use ribbon or yarn to create an arch so you can actually hang your new creation up.

And you're done!


OPTIONS!

~ For a sentimental touch, write the names of those you care about on the hearts, or attach a picture. It'll make you smile every time you glace at it and remember the good times with the ones you love the most.

~ You can also add small pictures of friends and family to the hearts.

~ Instead of hearts, you can always use raindrops if you feel this is a bit to 'Valentine's Day' looking.

~ Create a kawaii face on the cloud. Eyes open or closed, it'll be adorable!

Thanks for reading!  I hope you give this project a try.

 Let me know what you think in the comments below or on Facebook. You can also get ahold of me directly by either e-mail or commenting in the box to the right of your screen. I'll comment back or answer any questions you may have.

 Kat

Monday, April 14, 2014

April Favorties Youtube Video!

Hello Lovelies~

 As most of you know, I'm rather nervous in front of a recording camera, but I love v-logs and keep wanting to post to Youtube more, so I took a deep breath and fired up the camera in my laptop. I stumbled through it and was nervous the whole time, but I had fun and maybe I'll do it again ^_^

So here it is, my April Favorites Video!


I hope you like it! Please follow me on youtube. I'm going to start posting more so if you have any topics you'd like me to cover please comment on the video, comment below, or message me on Facebook (Kathleen Sweitzer) or at Twitter (@Angelshinigami).

 Thanks for reading and watching!

Thursday, April 10, 2014

LBC : Next On Your Lolita Wishlist

Hello Lovelies~


 "What's Next on Your Lolita Wishlist?" Is this week's Lolita Blog Carnival topic. I wasn't going to participate this week, due to trying to finish up a DIY project for a Friday post, but I pushed the DIY post to Sunday and am excited to show ya'll the Print I'm so in love with.
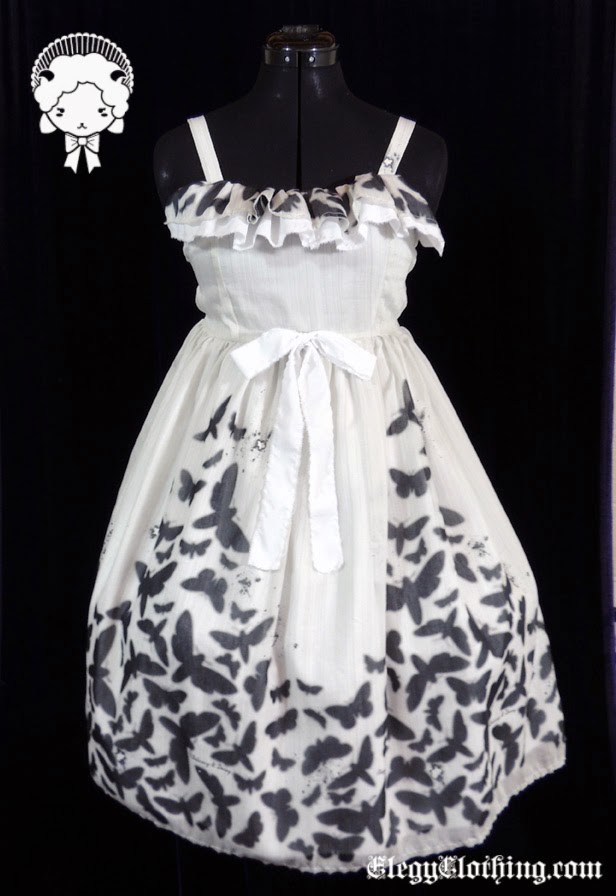
From the wonderful mind of one of my favorite American Designers, Elegy from Elegyclothing.com, I present to you the Delicacy and Decay Print.

 This is a pretty basic White and Black or Black and White mirror print. It comes in both an OP and a JSK. I like the JSK version myself as I feel it gives more shape to the body.

Moths, rather than butterflies, gives this print a distinctly Classic Southern Gothic feel. And the raw rough edges to the ruffles is a nice touch. It feels both structures and deconstructed. It's so wonderful and I think this print would be a wonderful new touch to my wardrobe.

D and D JSK ~ $185 - $200 (White or Black, I love both!)


Delicate Peignoir ~ $35 - $40


Darling Blouse ~ $65 - $70


Headbow ~ $25


So this is next on my Wishlist! I just love this print and can't wait to have it in my closet....at some point.

 If you liked seeing my Wishes, check out my Blogging Sisters from the LBC below ~

A Little Bit Of This.....

Northern Star

Buttcape

Lolita Glamour

Toothless Tigers

Mcduff's Auditorium


LinkWithin

Related Posts Plugin for WordPress, Blogger...